Plasterboard, when installed on a ceiling or wall, requires the boards to be joined so that no cracks form. In this technique, called “tape and jointing,” scrim tape is typically used.
Joint compound, also known as scotch tape, is used to seal the seams between sheets of plasterboard, making for a seamless final product in any plasterboarding job.
What exactly is Scrim Tape?
The use of scrim tape in the installation of plasterboard is a recent development. Made of a mesh of woven fibreglass threads, this joint filler has an adhesive on one side and can be applied to the spaces between plasterboards without the use of jointing compound. The jointing compound is contained by the tape’s mesh as it is plastered, resulting in a sturdy joint.
If you don’t reinforce the joints between plasterboards using scrim tape, the plaster will break. Thus, it is crucial to tape the connections properly, and scrim tape is a simple substance with which to produce a strong join. There are additional wider scrim tapes and double sided scrim tapes available, although they are both unnecessary when adhering plasterboard together.
Jointing Tape vs. Scrim Tape
Jointing tape, which was the industry standard until the invention of scrim tape, is still utilised by many professionals in the plastering industry today. Paper jointing tape has a crease running down the middle to facilitate its usage in corner junctions. Because it lacks adhesiveness, jointing tape must have a jointing compound put underneath it before it can be applied.
Jointing tape is preferred by professionals because of its low price and its simplicity of application in tight spaces, such as corners. Jointing tape is less expensive than scrim tape and available in longer rolls. The centre fold makes it convenient for usage in corner joints as well.
Scrim tape is more time-efficient than jointing compound since it may be applied directly to the joint. Although it is feasible to use scrim tape on corner joints, the procedure is a little more involved than with jointing tape, as will be detailed in more detail below.
There are pros and cons to using either scrim tape or jointing tape, and some professionals prefer using scrim tape for straight joints and jointing tape for corners.
Scrim Tape Application to a Flat Joint
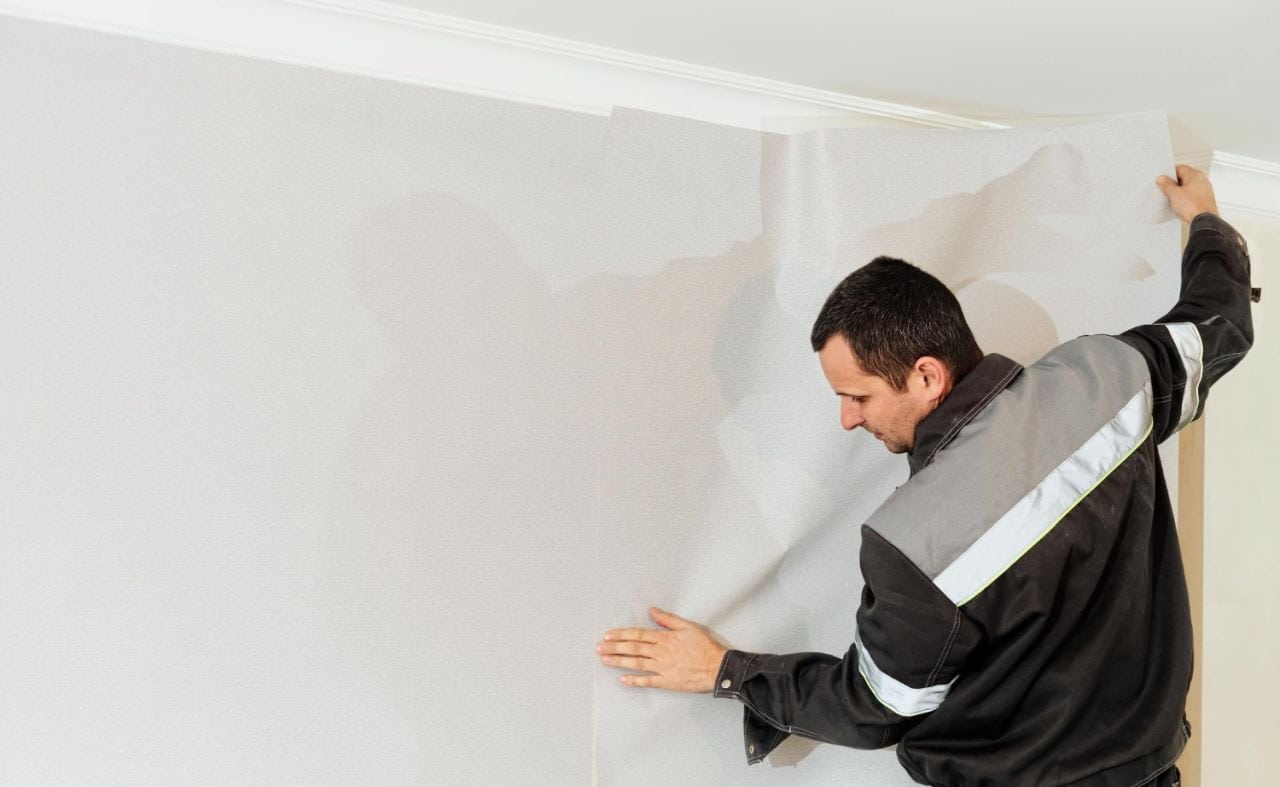
When should scrim tape be used? Right after the first layer of plasterboard is applied, but before the final skim coating is put on. Now, apply the tape smoothly over the joints, making sure it covers both sides equally. Tape used at an angle may not be as effective. To avoid breaking, the inside corners must be taped in the same way. Angle beading works better than caulk for fastening exterior corners, such as those seen around window recesses.
Plasterboard panels with flat joints must be bonded using scrim tape to avoid cracking after plastering. Scrim tape is not extremely sticky, which allows for some wiggle room before the plaster is applied but also requires careful inspection to ensure it is in place. Make sure the scrim tape is evenly spaced on both sides of the plasterboard, and then smooth it over the joints. Then, using a sharp knife, lop off the tip. The edges of four sheets of plasterboard can be sealed with scotch tape by running it over itself. Before applying a layer of plasterboard, double-check that the scrim tape has been laid correctly and neatly.
Essentials to keep in mind:
- If you want to keep the scrim tape from getting caught in the trowel while you apply the skim coat, it’s best not to overlap the pieces.
- If the scrim tape isn’t holding as well as you’d hoped, that’s okay. While it will aid in the curing process of the plaster covering, it will not be as strong as the adhesives often used to join glass, wood, or metal. You can typically rely on it to complete the job fine so long as it doesn’t start actually peeling off while you’re still working.
- Another factor that affects how effectively something sticks is the surface’s roughness. As can be expected, its adhesiveness is maximised on the smoothest surfaces; hence, if your plasterboard’s surface is slightly rough due to any reason, it will have a negative impact on the tape’s ability to stick. It’s not usually cause for alarm, but you should be aware of it nonetheless.
Why Is Plastering Tape Necessary?
When plastering a wall, there is one thing that must be overlooked: preparation. Being well-prepared is crucial.
It will be considerably more challenging to hide a defective surface beneath your work. Until you do it correctly, you won’t be able to provide a polished, professional result.
If you skip this stage, you’ll have to spend too much time trying to cover up the poorly prepared joints in the underlying surface. Hence, plastering tapes will be your best buddy whether you’re plastering a small section of wall in the kitchen or a large commercial building.
Plastering Tape Varieties
While installing drywall or plasterboard, seams and corners need to be reinforced. This is the job of plastering tape, also known as drywall tape. Several plastering tapes exist for various applications. Here’s a rundown of what each category entails:
Paper Tape
The most frequent kind of tape used for drywall is paper tape. It’s used to reinforce drywall joints and corners and is constructed of a thin, paper-like material. Paper tape is simple to use and can be incorporated into the initial coat of joint compound.
Why use paper tape?
Paper tape is the go-to of most professional plasterers since it resists breaking well, creates a strong junction, and can be used with any taping tool.
A high-quality paper tape will have precisely the proper number of spark perforations to release any trapped air and prevent bubbles below. Plasterers choose “crisp” paper because of its sturdy construction, rough surface (which helps the compound stick), and central crease (which makes folding and applying to corner joints much simpler).
Keep in mind that the two sides of the tape are not identical. While we buff both sides to improve adherence, the smoother side will always be on the interior of the roll. Hence, the best adhesion is achieved by applying the roll’s exterior to the wet compound.
Paper tape’s ultra-thinness (0.2 mm) allows for a nearly invisible finish. Self-adhesive fibreglass tape may be easier to work with for inexperienced plasterers, but Siniat advises using paper tape for stronger, less-defective joins.
If you’re going to use fibreglass tape, make sure every joint is backed by a frame member. Neither damp locations nor fire-rated structures are appropriate for the usage of fibreglass tape.
Mesh Tape
Mesh tape, often constructed from fibreglass or plastic mesh, is used to fortify drywall’s joints and corners. When compared to paper tape, mesh tape is more stiff and can be easier to apply. It’s also easier to apply without ripping or creasing.
FibaTape
FibaTape is an adhesive-coated mesh tape used in conjunction with joint compound to form a more durable bond. Crack-prone locations, such as joints or corners, might benefit greatly from the usage of FibaTape. Because of its resistance to mould and mildew, FibaTape can be used in damp environments.
Metal tape
Thin strips of metal, usually aluminium, are woven together to form metal tape, which is then utilised to reinforce the corners of plaster projects. Impact-prone places, such as high-traffic corners or door frames, benefit greatly from the application of metal tape. Joint compound can be used to apply metal tape, and then it can be sanded smooth once it has dried.
Corner Bead Tape
Specifically designed for use in corners, corner bead tape is a metal tape with a bead on either end. The flexibility of corner bead tape makes it ideal for usage in circumstances where the corners aren’t square. After the joint compound has dried, the corner bead tape can be sanded smooth.
Plastering tape, used to reinforce joints and corners and produce a strong, smooth finish, is an essential tool for anyone installing drywall or plasterboard. Depending on the job at hand, a plasterer might use paper tape, mesh tape, FibaTape, metal tape, or corner bead tape. Plastering tape selection is based on a number of factors, including installation method and desired longevity.
Common Mistakes in Using Plastering tape
Joint tape, drywall tape, or plastering tape is used to seal off the joints in a wall or ceiling before it is plastered or painted. Some typical errors in using plastering tape are as follows:
- Poor surface preparation: Ensure the surface is dry and clean before putting the tape. Weak joints might arise if debris or moisture prevents the tape from sticking correctly.
- Paper tape, fibreglass mesh tape, and self-adhesive tape are just a few of the options for plastering tape. There are advantages and disadvantages to each kind; pick the one that works best for your task.
- Failing to cover the tape with enough joint compound after it has been installed can result in an uneven and unattractive finish. If you don’t, you can end up with unsightly seams that are tough to cover up.
- Damage to the tape and a weakened joint might result from sanding the joint compound too much to achieve a flawless finish. Always sand gently, without applying too much force.
- Joint compounds need time to dry before the next coat can be applied, so don’t be impatient and skip this step. Inadequate joints and an uneven finish are the results of working too quickly.
- Without adding extra tape or corner beads to the corners, which are especially prone to cracking if they aren’t reinforced.
While applying plastering tape, it’s important to avoid these frequent pitfalls so that the final product looks polished and well-executed.
What do experts think of plastering tape?
Plastering tape is an essential tool for any drywall job, whether you’re starting from scratch or fixing an existing wall. It strengthens the connection between drywall sheets so that they don’t separate or split. Among of the most important considerations, according to plastering tape experts:
- Using the correct tape is crucial. Plastering tape comes in a variety of forms, each with its own set of pros and disadvantages. The most prevalent kind of tape is paper tape because it is cheap and simple to use. However, it can be trickier to apply than alternatives like self-adhesive tape or fibreglass mesh tape.
- Before applying the tape, the surface must be properly prepared, meaning it is clean, dry, and free of debris and impurities. The joint compound will go on more easily, and the tape will stick better.
- It is vital to use adequate joint compound after applying the tape in order to achieve a smooth surface. The tape could be apparent or the joint could be weak if not enough compound is utilised. However, if you use too much compound, you’ll end up with an unsightly hump in your wall.
- It’s crucial to give things enough time to dry: Depending on the humidity and temperature, joint compound might take anywhere from 24 to 48 hours to dry completely. Joints will be weaker and the finish will be uneven if the drying process is rushed.
- Edges and corners are more likely to crack or become damaged, so it’s a good idea to reinforce them with extra tape or corner beads to make sure the joint holds up well over time.
Experts agree that applying plastering tape properly is crucial to producing a high-quality, long-lasting finish. Professionals and amateurs alike can get fantastic results when using plastering tape if they follow standard procedures and take their time.
Conclusion
Installing plasterboard on a ceiling or wall necessitates the use of plastering tape. In place of jointing compound, this mesh of woven fibreglass threads fills the gaps between plasterboards.
Jointing tape (sometimes referred to as scotch tape) is used to seal the joints between sheets of plasterboard, resulting in a seamless finished product. A strong joint can be made with a minimal amount of effort using shim tape, which saves time because it can be applied directly to the joint. Professionals favour jointing tape because of its low cost and ease of application in challenging areas like corners.
Using shim tape to repair a joint instead of jointing compound saves time.
The article focuses on the advantages and disadvantages of using scrim tape for linear joints and jointing tape for angular ones. After the initial layer of plasterboard has been applied, but before the final skim coating has been applied, scrim tape should be used. When it comes to fastening exterior corners, angle beading is far superior to caulk. In order to prevent cracking after plastering, scrim tape must be used to bond together plasterboard panels with flat joints.
Plastering tapes are used to reinforce drywall joints and corners and are an absolute necessity when plastering drywall or plasterboard. Paper tape is the most popular option for drywall because it is strong, can be used with any taping tool, and resists breaking.

Professional plasterers prefer crisp paper tape due to its high durability, rough surface, and central crease. Siniat recommends using paper tape for stronger, less-defective joins, but self-adhesive fibreglass tape is easier to work with for inexperienced plasterers. While inexperienced plasterers may find self-adhering fibreglass tape easier to work with, Siniat recommends paper tape for stronger, less-defective joins.
The area where you plan to apply the tape must be clean and dry before you begin. It is essential to use enough joint compound and allow sufficient drying time after applying the tape. If you want to prevent cracking or damage, extra tape or corner beads should be applied to the edges and corners.
Plastering tape, when applied properly, is essential to achieving a high-quality, long-lasting finish, according to experts. Fantastic results can be achieved with plastering tape by both professionals and amateurs if they adhere to established practises and take their time.
Content Summary
- In this technique, called “tape and jointing,” scrim tape is typically used.
- The use of scrim tape in the installation of plasterboard is a recent development.
- If you don’t reinforce the joints between plasterboards using scrim tape, the plaster will break.
- Jointing tape, which was the industry standard until the invention of scrim tape, is still utilised by many professionals in the plastering industry today.
- Although it is feasible to use scrim tape on corner joints, the procedure is a little more involved than with jointing tape, as will be detailed in more detail below.
- There are pros and cons to using either scrim tape or jointing tape, and some professionals prefer using scrim tape for straight joints and jointing tape for corners.
- Right after the first layer of plasterboard is applied, but before the final skim coating is put on.
- Plasterboard panels with flat joints must be bonded using scrim tape to avoid cracking after plastering.
- Make sure the scrim tape is evenly spaced on both sides of the plasterboard, and then smooth it over the joints.
- Before applying a layer of plasterboard, double-check that the scrim tape has been laid correctly and neatly.
- It will be considerably more challenging to hide a defective surface beneath your work.
- While installing drywall or plasterboard, seams and corners need to be reinforced.
- This is the job of plastering tape, also known as drywall tape.
- Several plastering tapes exist for various applications.
- It’s used to reinforce drywall joints and corners and is constructed of a thin, paper-like material.
- Why use paper tape?
- If you’re going to use fibreglass tape, make sure every joint is backed by a frame member.
- Neither damp locations nor fire-rated structures are appropriate for the usage of fibreglass tape.
- When compared to paper tape, mesh tape is more stiff and can be easier to apply.
- Specifically designed for use in corners, corner bead tape is a metal tape with a bead on either end.
- The flexibility of corner bead tape makes it ideal for usage in circumstances where the corners aren’t square.
- After the joint compound has dried, the corner bead tape can be sanded smooth.
- Plastering tape, used to reinforce joints and corners and produce a strong, smooth finish, is an essential tool for anyone installing drywall or plasterboard.
- Joint tape, drywall tape, or plastering tape is used to seal off the joints in a wall or ceiling before it is plastered or painted.
- Ensure the surface is dry and clean before putting the tape.
- Paper tape, fibreglass mesh tape, and self-adhesive tape are just a few of the options for plastering tape.
- Failing to cover the tape with enough joint compound after it has been installed can result in an uneven and unattractive finish.
- Damage to the tape and a weakened joint might result from sanding the joint compound too much to achieve a flawless finish.
- What do experts think of plastering tape?
- Plastering tape is an essential tool for any drywall job, whether you’re starting from scratch or fixing an existing wall.
- Among the most important considerations, according to plastering tape experts: Using the correct tape is crucial.
- Before applying the tape, the surface must be properly prepared, meaning it is clean, dry, and free of debris and impurities.
- The joint compound will go on more easily, and the tape will stick better.
- It is vital to use adequate joint compound after applying the tape in order to achieve a smooth surface.
- Depending on the humidity and temperature, joint compound might take anywhere from 24 to 48 hours to dry completely.
- Experts agree that applying plastering tape properly is crucial to producing a high-quality, long-lasting finish.
Frequently Asked Questions About Plastering Tape
What is plastering tape used for?
Before plastering or painting, the seams between drywall panels or other building materials must be covered with plastering tape, also known as drywall tape or joint tape. It prevents the joints from cracking and separating over time by providing reinforcement.
How do I apply plastering tape?
Before applying plastering tape, make sure the area is dry and free of any debris. Wrap the tape around the seam and adhere it firmly. Joint compound should be applied over the tape to create a smooth finish. Wait until the compound is completely dry, then sand and repeat as necessary.
What are the different types of plastering tape?
Plastering tape comes in a variety of materials, including paper, fibreglass mesh, and self-adhesive varieties. Depending on the specifics of your project, you may want to consider one type over another.
Can I use plastering tape for other materials besides drywall?
Plastering tape can be used to strengthen cement board, plaster, and wooden joint connections. Tape and joint compound should be selected accordingly for the material being used.
How long does it take for plastering tape to dry?
In contrast to the joint compound used to cover it, plastering tape does not require drying time. Depending on the humidity and temperature, joint compound can take anywhere from 24 to 48 hours to dry completely. Joints will be weaker and the finish will be uneven if the drying process is rushed.

