Plastering may seem like a job reserved for professionals, but with the right tools, a little patience, and some guidance, anyone can master this rewarding DIY skill. Whether you’re looking to give your walls a fresh, smooth finish or tackle a few imperfections, learning how to plaster can save you time, money, and the hassle of hiring a tradesperson.
From choosing the right plaster for the job to applying that perfect finish. With a little practice, you’ll not only restore your walls but also gain the satisfaction of transforming a space with your own hands. Let’s dive in!
Preparing Your Walls for Plastering
The Importance of Preparation: Set Yourself Up for Success
When I first tried plastering, I learned the hard way that preparation is everything. It’s responsible for about 70% of the success of your plastering project. If you skip any of these early steps, you’ll end up with cracks, poor adhesion, or a lumpy finish that could take even more time to fix. Trust me, it’s better to take your time with preparation than to rush ahead and regret it later.
Clear and Protect the Workspace
Before you even think about plastering, clear the room. I can’t stress this enough—move your furniture out of the way or cover it with heavy-duty protective sheets to guard against plaster splatters. Once plaster gets on your furniture, it’s almost impossible to remove, and I’ve made that mistake before. You don’t need to empty the room entirely, but be sure to cover the floor with drop cloths. Don’t forget to tape off trim, sockets, and light fittings. Trust me, these little details make a huge difference.
Clean the Surface Thoroughly
A well-prepared wall surface is key. Start by cleaning your walls with a stiff-bristle brush to remove dust, dirt, and any old paint. If you’ve got old wallpaper, peel it off; plastering over wallpaper is a huge no-no. The plaster will simply peel it off again. In my first job, I didn’t clean the walls properly, and I ended up with plaster bubbling off within days. If you’ve got stubborn grease or stains, I highly recommend using sugar soap. It’s especially effective in kitchens and bathrooms, where the walls tend to accumulate grime.
Check Wall Stability and Repair Damages
Tap your walls—yes, you read that right. I learned this trick from a pro on one of my first jobs, and it works like a charm. If a wall sounds hollow or moves under pressure, you’ve got loose plaster, and that needs to be removed before moving forward. Any cracks or holes should be filled with a suitable filler or plaster. If the damage is more significant, use bonding plaster or scrim tape. Scrim tape helps prevent future cracking, especially on walls that have some movement. It’s a lifesaver, trust me.
Choosing the Right Plaster for the Job
The Best Plasters for Different Projects
When I first started plastering, I was overwhelmed by the different types of plaster available. The right choice can make all the difference in how your project turns out, so let me break it down for you.
|
Type of Plaster |
Ideal Use |
Example from My Experience |
|
Gypsum Plaster |
Best for most internal walls and ceilings. It’s easy to apply, dries quickly, and creates a smooth finish. |
I used British Gypsum Multi-Finish in my living room—loved the smooth, glossy result. |
|
Cement Plaster |
Ideal for exterior walls or where durability is key. Provides excellent protection against the elements. |
Used cement plaster on my shed’s exterior—stood strong through a brutal winter. |
|
Lime Plaster |
Perfect for restoration work; breathable and flexible, especially for old homes with damp issues. |
Restored a heritage-listed home with lime plaster—kept the original features intact. |
|
Undercoat Plasters |
Used as a base before applying finishing plaster. Includes browning, bonding, and hardwall plaster. |
Browning plaster was perfect for a rough surface I worked on in the past—solid base! |
When to Seek Expert Advice
Not sure which plaster to choose? Don’t be afraid to ask an expert. Choosing the wrong plaster can lead to cracking, moisture retention, or a poor finish. I’ve found that consulting an expert early on can save a lot of time and money. When in doubt, always choose a plaster that fits the specific needs of your project.
Mastering the Art of Mixing Plaster
How to Mix Plaster for the Perfect Consistency
Mixing plaster is one of the trickiest parts of the process. I can still remember my first attempt—let’s just say it wasn’t pretty. You want a smooth, lump-free mix, but too often, I’ve seen people make it too thin or too thick, and that leads to problems down the line. Here’s the method that works for me:
- Follow Manufacturer Instructions: This is crucial. Always start by reading the plaster manufacturer’s instructions. They’ll give you the exact water-to-plaster ratio. Trust me, I once mixed plaster without reading the instructions, and it turned into concrete instead of plaster.
- Use Clean Tools and Containers: The tools you use can affect the final product. Make sure your buckets and mixing tools are clean before starting. Leftover plaster residue can impact the consistency and quality of your new batch.
- Add Plaster to Water (Not the Other Way Around): This is a game-changer. Add plaster to the water, not the other way around. This prevents clumping and ensures a smooth mix. I learned this the hard way in my early days, when I ended up with more clumps than I’d like to admit.
- Achieve a Creamy Consistency: Aim for a smooth, lump-free mix, similar to thick Greek yogurt or peanut butter. Stir for a minute or two after adding all the plaster to ensure there are no dry patches at the bottom of the bucket. If you can scoop it up on your trowel without it dripping, you’re good to go.
- Mix in Small Batches: Plaster sets quickly, so don’t mix too much at once. I recommend mixing smaller batches, especially if you’re new to plastering. Most plasters give you about 45-60 minutes of workable time, but don’t push it!
Step-by-Step Plastering: Applying the Plaster

The two-coat system is the tried-and-true method. As a beginner, it’s tempting to try applying a single thick coat, but trust me, it’s better to take your time and do it right.
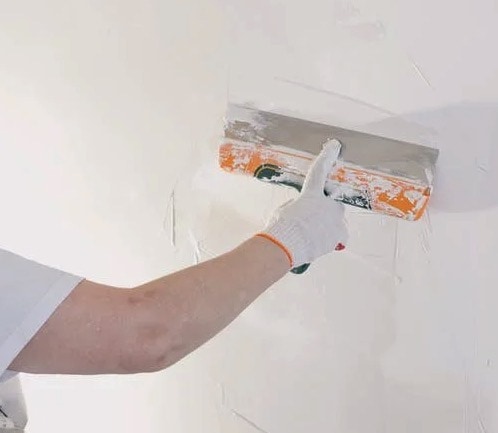
- First Coat (Scratch/Base Coat): This is the base layer. Don’t worry too much about perfection just yet. Start by loading your hawk with plaster, then use your trowel to apply it to the wall. I always recommend starting from the bottom and working your way up—this way, any drips are covered by the next layer. Apply a thin, even coat (around 1/8 to 1/4 inch thick). Remember, you’re not aiming for perfection with this coat.
- Flatten the First Coat: Once the first coat is on, it’s time to flatten it out. You want a smooth base for the second coat to adhere to. If you don’t have a Speedskim (a tool that makes flattening a breeze), just use your trowel. Smooth the surface as much as possible before moving on.
- Second Coat (Finish/Skim Coat): The second coat is where the magic happens. It’s the final finish, and it needs to be flawless. Wait until the first coat is slightly damp but firm to the touch—this usually takes about 20-30 minutes with Multi-Finish plaster. The second coat should be thin, around 1/16 to 1/8 inch thick, and applied with care to achieve a smooth, even surface.
Plastering isn’t just a skill—it’s a rewarding way to transform your space and save some money in the process. By following this step-by-step guide, you’ll be well on your way to becoming a plastering pro.
Don’t rush through the process—take your time, follow the steps, and before you know it, you’ll be admiring your own work. Ready to start plastering? Your walls are waiting for you.
