Plastering a wall isn’t just about slapping mud on and hoping for the best it’s about careful prep, the right mix, and steady technique to get that smooth, professional finish. Over the years working on Melbourne homes, from old Victorian terraces in Fitzroy to modern apartments in Southbank, I’ve seen how a good plaster job can transform a space, and how a rushed one can cause cracks, flaking, and costly re-dos. Whether you’re tackling a DIY project or just curious about the process, this guide breaks down each step from surface prep to finishing coats — so you can understand what it really takes to plaster a wall properly.
Why Proper Wall Plaster Application Matters
Plaster isn’t just about looks. Done properly, it gives you a strong, flat surface that holds paint well, hides imperfections, and lasts decades. Done poorly, you’ll be staring at cracks, bubbles, and flaky bits before the paint even dries.
I remember a job in Brunswick where the owners had tried to patch their lounge room themselves. They skipped sealing the surface with PVA, slapped on a thick coat, and wondered why half of it ended up on the floor once it dried. We had to strip it back, re-prepare, and apply two proper coats. What could have been a weekend DIY turned into a week-long re-do — and a bigger bill.
Here’s why taking plastering seriously pays off:
- Longevity: A correctly applied plaster wall can last for decades without cracking.
- Finish: Smooth plaster makes painting easier and saves you hours of sanding.
- Moisture resistance: In Melbourne’s damp winters, poor plastering can trap moisture and cause mould.
- Resale value: Buyers notice dodgy walls. Clean, even plasterwork adds polish to a home.
Common DIY Mistakes
- Skipping wall prep (leads to poor adhesion).
- Mixing plaster too runny or too stiff.
- Applying too thick a coat.
- Letting the plaster dry out too quickly with heaters.
Local Insight
In Melbourne, our climate plays tricks. Cold, wet winters slow drying, while hot summer days can make plaster set too quickly. I’ve seen plaster crack in old Victorian terraces in Fitzroy simply because a heater was blasting on the fresh wall. Timing and conditions matter as much as technique.
Safety First – Essential Plastering Safety Tips
Before you even think about mixing plaster, you’ve got to look after yourself. I’ve seen too many blokes dive in without goggles or gloves, only to end up with plaster burns on their hands or dust in their eyes. Plastering might not look dangerous, but one slip on a ladder or a splash of mix in the eye can ruin your day fast.
Protective Gear You Shouldn’t Skip
- Safety goggles – Stop plaster splashes or chips of old render from finding their way into your eyes.
- Dust mask – Dry plaster powder kicks up fine dust. Inhaling that muck isn’t doing your lungs any favours.
- Gloves – Protects against cuts from hawks and trowels, and stops lime- or cement-based plaster from burning your skin.
- Non-slip boots – Essential if you’re climbing ladders or moving around on a dusty drop sheet.
Electrical and Workspace Safety
One mistake I’ll never forget happened on a reno in Footscray. The homeowner had left power on at the sockets, and when the wet plaster hit, sparks flew. Luckily, no one was hurt, but it could have been a disaster. Always switch the power off at the fuse box before covering sockets or pulling light fittings.
Keep the workspace tidy — plastering needs room to move. A cluttered floor full of buckets and tools is a recipe for tripping. If you’re working in a tight space, set up your tools and materials in a logical order: prep gear on one side, mixing gear on the other, plasterboard or wall in front.
Working at Heights
If you’re tackling ceilings or high walls, don’t chance it by stretching off a ladder rung. Reposition the ladder or use proper scaffolding. I’ve seen ceilings in Toorak cracked and uneven simply because someone was overreaching, trying to save a couple of minutes. Trust me — those minutes you think you’re saving will cost hours later.
Ventilation
Melbourne homes, especially older weatherboards, can get stuffy when you’re working indoors. Good airflow not only keeps you comfortable but also helps plaster dry evenly. Open a window, set up a fan if needed, and let the room breathe.
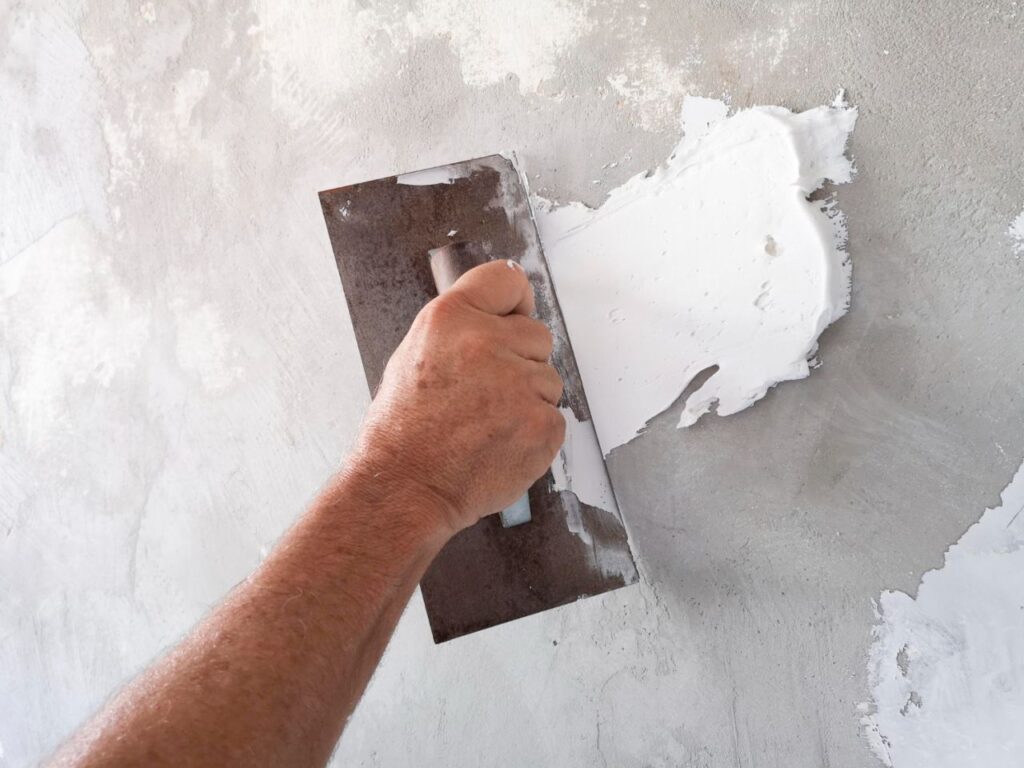
Tools and Materials Needed for Plastering a Wall
Plastering isn’t a job you can bluff with half the gear. I’ve rocked up to more than one site where someone’s tried to smear plaster with a paint scraper or a dodgy plastic tray — and the result always looks like it. The right tools don’t just make the job easier, they give you the clean, flat finish that separates a tradie’s work from a weekend hack.
Core Plastering Tools
- Plastering Trowel – Stainless steel, 13–14 inch is a good size. Anything smaller feels like kids’ play, anything bigger gets heavy quick. A flexi trowel comes in handy for polishing at the end, but beginners should master a rigid one first.
- Plasterer’s Hawk – Think of it as your mobile workstation. Plastic hawks are lighter (good for learners), while wooden ones last longer if you’re doing this often.
- Bucket Trowel – Wide and sturdy, perfect for scooping mix from the bucket onto the hawk without making a mess.
Mixing Gear
- Mixing Bucket or Tub – Needs to be big, clean, and tough. I’ve seen people try using old paint tins — hopeless. You want room to get a drill paddle in there and whip the mix properly.
- Mixer Drill with Paddle – A game changer. Sure, you can mix by hand, but for a smooth, lump-free plaster that doesn’t set too quickly, a paddle is worth it. I learned the hard way years back on a Richmond site — hand-mixed a big batch, half-set before I got it on the wall. Never again.
- Clean Water Supply – Tap water is fine, but make sure buckets are spotless. Even tiny lumps of old plaster will contaminate your fresh mix.
Prep and Finishing Tools
- Scraper & Wire Brush – For scraping away loose paint, wallpaper or flaky plaster. Don’t skip this — a dirty surface is the number one reason plaster peels later.
- Scrim Tape – Fibreglass tape that stops cracks from reappearing. Always use it on joints and hairline cracks.
- PVA Glue or Bonding Agent – Diluted and rolled on, it evens out suction and gives your plaster something to bite onto. In Melbourne’s old red-brick homes, walls drink moisture fast, so PVA is non-negotiable.
- Water Brush/Spray Bottle – For keeping edges clean and helping smooth coats during the final passes.
- Fine-Grit Sandpaper – For lightly smoothing any imperfections once the wall’s dry.
Protective and Covering Materials
- Dust Sheets/Drop Cloths – Don’t think you’ll “just be careful.” Plaster splatters — and it doesn’t wash out of carpet.
- Spot Board – A board on the floor where you drop extra plaster. Saves you from bending down to the bucket every two seconds.
Wall Surface Preparation – The Foundation of a Smooth Finish
I’ll say it bluntly: nine out of ten dodgy plaster jobs I’ve been called to fix in Melbourne could’ve been avoided if the surface had been prepped properly. People think plaster will magically cover cracks, flaky paint, or wallpaper glue. It won’t. All those sins show back through sooner or later.
I remember patching a rental in St Kilda where the tenant had skimmed straight over wallpaper. Looked fine for a week, then the plaster bubbled and flaked as soon as the landlord painted it. We had to strip everything back to bare walls and start again. That’s why prep is king.
Step 1: Clear and Protect the Area
- Remove furniture if you can, or cover it with heavy-duty plastic.
- Lay drop sheets on the floor — tape them down so they don’t shift while you work.
- Protect sockets and switches with masking tape. Best to remove fittings altogether if you’re confident with electrics (after turning off the power at the switchboard).
Step 2: Remove Loose Material and Clean the Surface
- Scrape off wallpaper, paint, and flaky plaster. A steamer speeds up wallpaper removal, especially on old double-brick homes.
- Wipe the brush on the wall to knock back any stubborn flakes.
- Wash down greasy or dusty areas. A quick scrub with sugar soap works a treat on old kitchens where walls have soaked up years of cooking residue.
Step 3: Fix Imperfections
- Small holes – fill with filler or base coat plaster.
- Larger problem spots – hack back to solid material and apply a bonding plaster.
- Cracks and joints – run fibreglass scrim tape over them. In Melbourne’s weatherboard homes, movement in the timber frame often leads to hairline cracks — scrim stops them from reappearing after you plaster.
Step 4: Control Surface Suction
This is the step too many DIYers skip. Every surface absorbs moisture differently. Brick and block walls suck it in fast, while painted concrete barely absorbs at all. If you don’t control this, plaster either dries too quickly (cracks) or won’t stick (slides off).
- PVA glue – Dilute 1 part PVA to 3 or 4 parts water (depending on wall type). Roll or brush it on.
- Timing matters – Don’t let it dry completely. You want it tacky to touch when plastering starts.
- Blue Grit – Great for very smooth or painted surfaces. It has sand in it, giving the plaster something to grip.
