Plastering is a skilled craft, and it takes many years of practise before one can confidently call oneself an expert. DIY plastering projects may seem daunting, but with the correct information and tools, you can produce results that would wow a pro.
You’ve decided to fix the hole in the wall at last. Good. Some plastering basics are common knowledge, but others aren’t, so it’s important to learn them before you start.
Do not worry. Plastering might be challenging, but you can do it well the first time with these pointers.
Readers looking to learn the basics of DIY or enhance their skills may find this article informative.
Plastering takes time and effort, can leave you with muscle soreness and aches, and can cost several hundred dollars.
The kind of money that most people don’t have, right? Absolutely, but you know what?
The job was a dirty one.
Quite a bit of sanding and consequent dust production was involved.
There are a lot of obstacles that must be overcome while plastering a wall by oneself.
How quickly the plaster begins to flake off is affected by several variables (dries, to you and me).
The DIY plasterer is in a race against the clock, and the drying time of the plaster is the deciding element in whether or not they finish in time. Multiple factors affect how quickly plaster dries.
While some, like the wall’s suction, may be controlled, others, like the temperature and humidity, must be taken into account.
Become a Plastering Pro in Your Own Time by Using These Tips!
Do-it-yourselfers who are interested in learning about making and applying plaster to walls will find this information to be helpful. The key is to apply the right amount of force at the right time while keeping the mix at the right consistency (wetness/tackiness).
Plastering is a piece of cake if you know what you’re doing and have the right equipment.
Whether you’re fixing a small hole or plastering an entire wall, you’ll need a few specific equipment.
Luckily, you can find them at almost any convenience shop today.
Still, if you’re set on handling things on your own, you should give the accompanying techniques and suggestions significant study.
As a first step, you must get your workspace ready
At first, most people tend to make some rookie errors. The first and most crucial stage in restoring plaster is fixing any damage that has occurred.
So, we’ll go right to work cleaning up the area and priming it for the plaster application.
Gently brush away any rough places in the old plaster with a brush with stiff bristles.
This is the single most important factor in determining the final quality of the plastering.
It guarantees the finished product will have a sleek look, free of decorative remnants, and the ability to blend in with the surrounding, untouched environment.
Plastering the Walls
You can’t frost your cake properly if the icing recipe is wrong. It can’t be done since the substance is too lumpy and dense. You can’t plaster a wall if you don’t know how to mix plaster. Before you can even begin to plaster, this must be done first.
Get ready for your drill by rounding up two large buckets and a paddle (or an electric mixer, if you prefer). Because of this, you can now blend the plaster.
In spite of the fact that there are many types of plaster, multi-finish is the most typical.
To make plaster, fill a bucket halfway with the substance, then add water. Initiate mixing at a moderate speed using the paddle and drill.
Put in as much water as necessary until the plaster reaches a creamy consistency that can be piped.
Check to see that the contents of your bucket are evenly distributed and that there are no dry spots.
We use a bucket trowel to spread the concrete, and then we inspect the mixture by hand in the corners.
Very little amounts of plaster should be mixed at a time. Plaster hardens rapidly, so you’ll either waste a lot of time waiting for it to dry before you can use it, or you’ll waste your time trying to use it and finding that it doesn’t adhere properly to the wall.
To completely rinse the paddle, fill a second bucket with water and run the mixer on high.
Again, if you don’t want to end up with dried plaster flakes in your next batch of plaster, make sure your tools are clean.
It is also possible to use a wet paintbrush to clean the inside of your mixer.
You should never settle for subpar results
You can’t expect to get good results if you skimp on the ingredients. Because of this, you should never use unclean plaster. In the same vein, you should never use flaking plaster. It’s not a big deal to just throw away the plaster and start over.
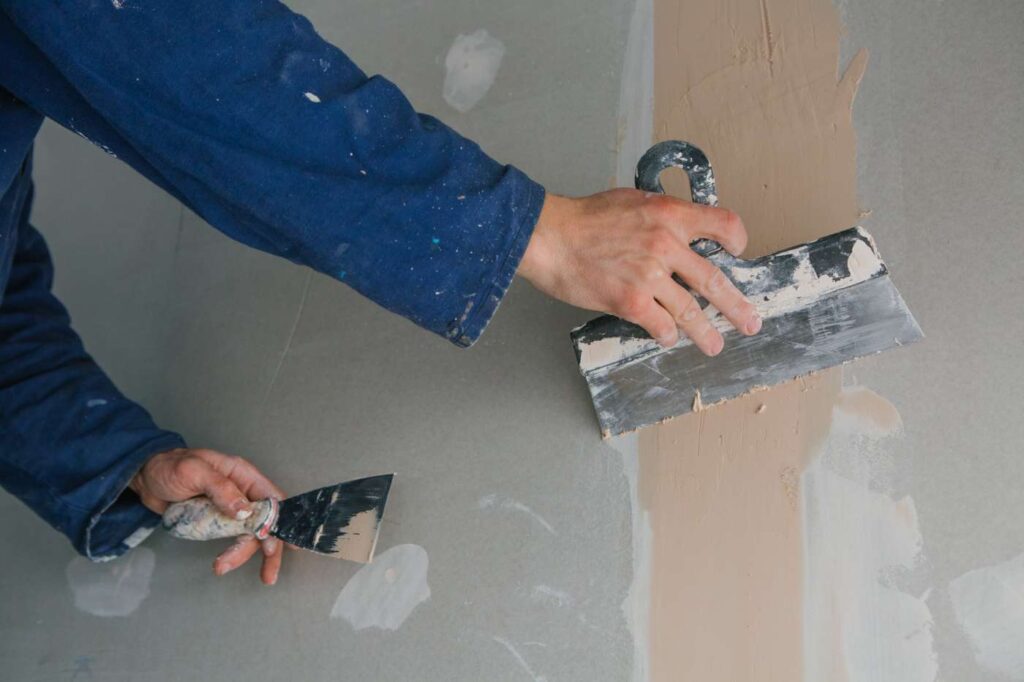
Trowel Adore You
When working with plaster, the trowel is the tool of choice for achieving a uniform surface, applying and fixing imperfections, and polishing the finished product.
The only connection you have to the surface you’re working on, so take care of it. The trowel should always be in good condition and of the right kind.
Never use a shovel or a trowel you find lying about.
You need a true plastering trowel if you want to conduct a professional job of plastering. These trowels won’t break the bank and are available everywhere.
As long as it remains in good shape, the trowel can be put to many uses.
The trowel should be clean, finely polished, and smooth despite the patination that comes with its many uses.
The trowel’s convex curve may get more flattened with use, which is normal. Improving the outcome of your plastering work in this way.
You can buy a well-used trowel that has already been put to good use. If you’re in the market for a used trowel, go no further than Marshalltown, one of the industry’s leading producers. Because they are the prefered trowel of professionals, their price will reflect it.
A trowel that is 11 inches in length is suitable for beginners. You can go to a larger trowel as your work speed increases. Know that bigger trowels are more challenging to work with. Lengths of 14-20 inches are typical for trowels.
One fantastic tip for keeping your trowel in pristine shape is to run it through a combination of fine wet and dry paper every so often. Some plasterers round off the very end of sharp corners to make them more comfortable to the touch. This will make the workplace safer by reducing the possibility of chipping and scuffs.
Be Sure to Schedule Enough Time to Complete the Project
The plastering process is moving along far more quickly than anyone had anticipated. Plastering is not a job that lends itself nicely to frequent breaks because to the set time necessary for preparation and cleanup.
It will take at least a half a day to mix the plaster, cover and finish your walls, and then clean up (6-7 hours).
Checking for a Level Wall Before Skimming
Display various points along the wall against a long spirit level or a long straight piece of wood to compare the heights.
Large hollows (larger than 2-3mm) or uneven wall parts should be filled in before applying Thistle Bonding.
After the bonding has been applied, a straight edge is used to check for unevenness.
Humps of a modest nature are generally accepted.
Many people have the misconception that skimming is easy to achieve over any surface, but if the wall being skimmed isn’t level, the DIY plasterer will have a hard time getting a flat finish. Considering how difficult this task already is, you should take any measures necessary to facilitate your progress.
Keep the Water Moving Constantly
Make sure your tools are clean before you use them. Plaster, once mixed, hardens and sets in record time; this much is indisputable.
Plaster dries into a sticky substance that requires careful, repeated washing.
Some of the explanations for this are:
- It’s likely that plastering tools may need to be replaced if they aren’t fully washed with water before drying. It is not only inefficient but also very expensive.
- Unfortunately, the tainted plaster precludes its use. You should get rid of it right away.
Having access to clean water on a regular basis is a prerequisite for securing a high-paying position. This is especially problematic on construction sites with limited access to potable water.
It’s imperative that you plan ahead and have access to plenty of water for washing and blending purposes. It’s important to remember that plaster might cause plumbing to clog.
Large amounts of plaster slurry should not be poured down drains or flushed down the toilet. Water that has come into contact with plaster should not be put down a sink drain but rather a major outside drain.
Keep your buckets and trowels pristine at all times, and only use clean water while mixing the plaster.
- Do not use plaster that is peeling or has otherwise lost its integrity. Throw away the old wall covering and start fresh.
- There should be no use for contaminated plaster.
Using a Primer
The primer is essential for removing the wall’s suction and allowing the plaster to cure correctly.
If no primer is used, or if the primer is not placed correctly, the wall will soak up all the moisture in the plaster solution.
When this occurs, a condition known as “blown” plaster sets in, in which the dried plaster begins to flake and peel off.
High-quality primers are readily available at any hardware store.
You should still pick up the basic primers even though there are primers made especially for drywall or wallpaper adherence.
However, if you happen to have some PVA glue lying around in your garden shed, you can make your own primer. Many advocates of DIY will advise you to do this, and all it takes to get started is:
- The amount of PVA and water you’ll need to create the mixture will depend on the size of the area you’re plastering.
- You’ll obtain the best bonding results if you apply it shortly before you plaster the area.
- Feel free to put your fingers on the primer and see how it feels. If it feels damp when you touch it, you need to wait until it gets slightly gluey. As soon as this happens, you can set out on your adventure.
Tin snips, not a hacksaw, are the tool of choice for cutting an angle bead to size
Do not attempt to cut angle beads with a hacksaw; tin snips should be used instead. When you need to cut more than a few pieces of tin, tin snips are a must-have tool.
Get out your pencil and create a mark before you start chopping.
One of the tin snips’ flat sides must be snipped up to the corner before they may be used.
You have to turn the beading over and cut the back so that the corner bulge is the only thing keeping it together.
Repeatedly bending the bead at the cut should be done while firmly gripping the object in two hands.
Maintaining a comfortable vantage point is essential because
It is crucial that you take extra care to maintain the angle of the edges.
After only a few twists and turns, the metal will wear and snap at the junction. In order to avoid injury to your hands from the cut-angle bead’s sharp edge, it is recommended that you wear protective gloves.
Examining for Protruding Components and Junk
Locate and remove anything that is protruding from the wall or is at an abnormal height.
When you take down the wallpaper on an old wall, you never know what you could find. Things like plasterboard screws should not be protruding from the wall.
When fastening screws into plasterboard, care must be taken to avoid ripping the paper.
If the skirting was removed, double check that all fasteners have been pulled out.
I was concerned that the shifting of the wooden blocks attaching the skirting to the brickwork would cause cracks in the plaster when you skimmed, so I recommend that you remove them. As soon as they go, fill the empty gap with sand and cement.
Use a brush to clear the dust if the walls are unclean
Before you commence plastering over ancient walls, make sure the binding is in good shape. If the bonding sounds hollow when touched, it may have come loose from the wall. It needs to be carefully chipped out and rebonded. On the other hand, if the wall is hollow throughout, it may be necessary to dismantle it and re-bond the bricks.
To get the best results from your skimming efforts, we advise using Thistle Multi-Finish
Try to resist the temptation to use convenient products like one-coat plaster or other finishing plaster brands.
When it comes to commercial applications, nobody does plaster quite like Thistle and their Multi-Finish.
This plaster is available at any of the big-box home improvement stores; just look for the label in bright orange.
This is the most common form of plaster used by professionals as a finishing plaster over undercoat plasters or plasterboard.
When properly mixed, plaster turns into a salmon-colored, creamy paste that may be polished to a high gloss and resemble an eggshell. It is recommended to apply at least two coats of plaster, with the maximum thickness being roughly 3 mm.
The amount of plaster you’ll need can be easily determined with some basic math. When covering an area of 9 square metres, one 25-kilogram bag of plaster will be needed. You should also get an extra bag before starting the job, just in case.
Vacuum Pressure Regulation
Skimming over an existing wall or a recently bonded out wall requires you to master the suction. That’s why it’s crucial to reduce the plaster’s surface’s water absorption rate.
Your skin will become brittle and explode like a rocket if you skim the wall, so be careful.
However, this leaves you with much less time to trowel and smooth the plaster, and it may dry before you’re done.
The rate at which a wall absorbs moisture from plaster can be greatly slowed by applying a coat of diluted PVA to the wall before plastering. Put a coat of PVA/water on the wall the night before you plan to plaster it.
Do this again right before you begin mixing your plaster so that the PVA solution is tacky on the wall when you begin skimming.
PVA and water form a barrier that will keep moisture within the plaster. Plasterboard doesn’t need to be primed with PVA for skimming.
Neither the plaster nor the drywall should be sanded
While there are varying schools of thought on the topic, most people agree that sanding down plaster is only essential if the work was poorly done to begin with.
It’s possible that this happened because you weren’t careful, or because something unexpected happened.
Plastering calls just a basic understanding of six separate processes and only ten percent actual skill.
If you’ve followed the six procedures carefully, you shouldn’t need any additional assistance in achieving a flawless plaster finish.
Walls that are smooth, appealing, and defect-free can be achieved by careful application of plaster at each stage.
This makes it challenging to sand plaster. The first issue is that, contrary to popular belief, it won’t make a lousy job any better. When plastering, this is a perfect excuse to work rapidly, as faults can always be fixed afterwards.
One other problem is that sanding plaster is more time-consuming and laborious than just doing it right the first time, and it won’t improve the quality of the end result.
Plaster’s destructive effects on sanders are the root of the problem.
Once you start sanding, the plaster dust will immediately jam the sander. You’ll have to work harder, but that will just help the laying plaster on paper to sink in even more.
To further enhance the shine of an object, rub it back and forth between two flat surfaces.
To achieve the desired outcomes with this method, you will require a substantial quantity of sandpaper. After you’re done sanding, though, the wall’s flaws will stand out much more starkly.
This is because no sanding was done, which is a contributing factor. If you polish it up, it will look brand new.
Sanding plaster can be difficult because of the dust it produces. Taking down even a little section of wall will let dust into your home. There will be a lot of cleanup on your hands, and you may even find dust months after the fact.
Conclusion
Plastering tasks at home can seem daunting, but with the right knowledge and equipment, you can create results that would wow a pro.
The drying time of the plaster is the determining factor in how rapidly it begins to flake off (dries, to you and me). Use a brush with strong bristles to smooth over any cracks in the old plaster.
This is the most crucial component in establishing the final quality of the plastering.
It would be best if you didn’t waste time waiting for the plaster to cure before applying it because it sets up quickly.
Take good care of the trowel because it is your only tool for contacting the ground. If you want to plaster like an expert, you need a plastering trowel. These trowels are cheap and easy to find.
You should only use clean water to mix the plaster and clean your instruments before using them. Keep in mind that plaster has the potential to choke pipes.
Those with PVA glue in the tool shed can easily whip up their own primer.
Any hardware store should have high-quality primers in stock. When screwing into the plasterboard, take precautions to avoid ripping the paper.
Knowing how to control the suction is essential for skimming over an existing wall or a wall that has been freshly bonded out. At least two plaster coatings are recommended, with a maximum thickness of about 3 mm.
One 25-kilogram bag of plaster is sufficient to cover 9 square metres. A coat of PVA that has been diluted can significantly reduce the pace at which plaster absorbs water from a wall.
The plaster will retain its moisture thanks to the barrier formed by PVA and water. If the initial job were done poorly, sanding the plaster would be necessary. Plaster dust makes it difficult to sand the material.
Rub an object back and forth between two flat surfaces to increase its shine. You’ll have a lot of mess to clean up, and you might even find dust six months later.
Content Summary
- Some plastering basics are common knowledge, but others aren’t, so it’s important to learn them before you start.
- Readers looking to learn the basics of DIY or enhance their skills may find this article informative.
- Gently brush away any rough places in the old plaster with a brush with stiff bristles.
- This is the most important factor in determining the final quality of the plastering.
- You can only plaster a wall if you know how to mix plaster.
- Because of this, you can now blend the plaster.
- Initiate mixing at a moderate speed using the paddle and drill.
- Very small amounts of plaster should be mixed at a time.
- Using a wet paintbrush to clean the inside of your mixer is also possible.
- The trowel should always be in good condition and of the right kind.
- It would be best if you had a true plastering trowel to conduct a professional plastering job.
- As long as it remains in good shape, the trowel can be put to many uses.
- Improving the outcome of your plastering work in this way.
- You can buy a well-used trowel that has already been put to good use.
- You can go to a larger trowel as your work speed increases.
- Many people believe that skimming is easy to achieve over any surface, but if the wall skimmed isn’t level, the DIY plasterer will have a hard time getting a flat finish.
- Make sure your tools are clean before you use them.
- Plastering tools may need to be replaced if they must be fully washed with water before drying.
- Keep your buckets and trowels pristine, and only use clean water while mixing the plaster.
- The primer is essential for removing the wall’s suction and correctly allowing the plaster to cure.
- However, if you have some PVA glue in your garden shed, you can make your primer.
- Do not attempt to cut angle beads with a hacksaw; tin snips should be used instead.
- To avoid injury to your hands from the cut angle bead’s sharp edge, it is recommended that you wear protective gloves.
- Double-check that all fasteners have been pulled out if the skirting was removed.
- We were concerned that shifting the wooden blocks attaching the skirting to the brickwork would cause cracks in the plaster when you skimmed, so we recommend removing them.
- Before plastering over ancient walls, ensure the binding is in good shape.
- On the other hand, if the wall is hollow throughout, it may be necessary to dismantle it and re-bond the bricks.
- The amount of plaster you’ll need can be easily determined with some basic math.
- Skimming over an existing wall or a recently bonded-out wall requires you to master the suction.
- However, this leaves you much less time to trowel and smooth the plaster, and it may dry before you’re done.
- The rate at which a wall absorbs moisture from plaster can be greatly slowed by applying a coat of diluted PVA to the wall before plastering.
- Put a coat of PVA/water on the wall the night before you plan to plaster it.
- PVA and water form a barrier that will keep moisture within the plaster.
- The plasterboard can be primed with PVA for skimming.
- Once you start sanding, the plaster dust will immediately jam the sander.
- After you’re done sanding, the wall’s flaws will stand out much more starkly.
- This is because no sanding was done, which is a contributing factor.
- Sanding plaster can be difficult because of the dust it produces.
- Taking down even a little section of the wall will let dust into your home.
Frequently Asked Questions About Plaster
Is DIY Plastering Easy?
It is a skill, and it takes practice, care, precision and a lot of experience to get it 100% right. That is, however, not to say you can’t DIY plastering. Of course, you can, but you should know it’s going to take some time to learn the process and get to know what you’re doing.
Why Does My Plaster Go Off so Quickly?
Plaster has additives that prevent it from setting, so you have time to work with it. If the plaster is out of date, it will set rather fast, sometimes even before turning it out onto your spot board.
Can It Be Too Hot to Plaster?
Plaster shall be applied when the ambient temperature is higher than 40 degrees Fahrenheit (4.4 degrees Celsius) unless provisions are made to keep cement plasterwork above 40 degrees Fahrenheit (4.4 degrees Celsius) during application and 48 hours after that.
What Is the First Coat of Plaster Called?
Rendering Coat
The first coat is known as the rendering coat. The Second coat is known as a floating coat. The third coat is known as the setting coat or finishing coat.
Does Plaster Dry in Cold Weather?
Cold, dry air on the wall’s surface can absorb warm moisture from the wall rapidly and can lead to plaster shrinkage cracks. In addition, low temperatures can cause cement plaster to take longer than normal to set and gain strength, which delays floating, troweling, and production and raises labour costs unnecessarily.

