Applying plaster to a wall is a skilled task that requires careful preparation and technique to achieve a smooth and even finish. There are several methods for applying plaster, each suited to different types of plaster and desired finishes. One common method is the “two-coat” or “three-coat” plastering technique, which involves applying a base coat of plaster followed by one or two finishing coats.
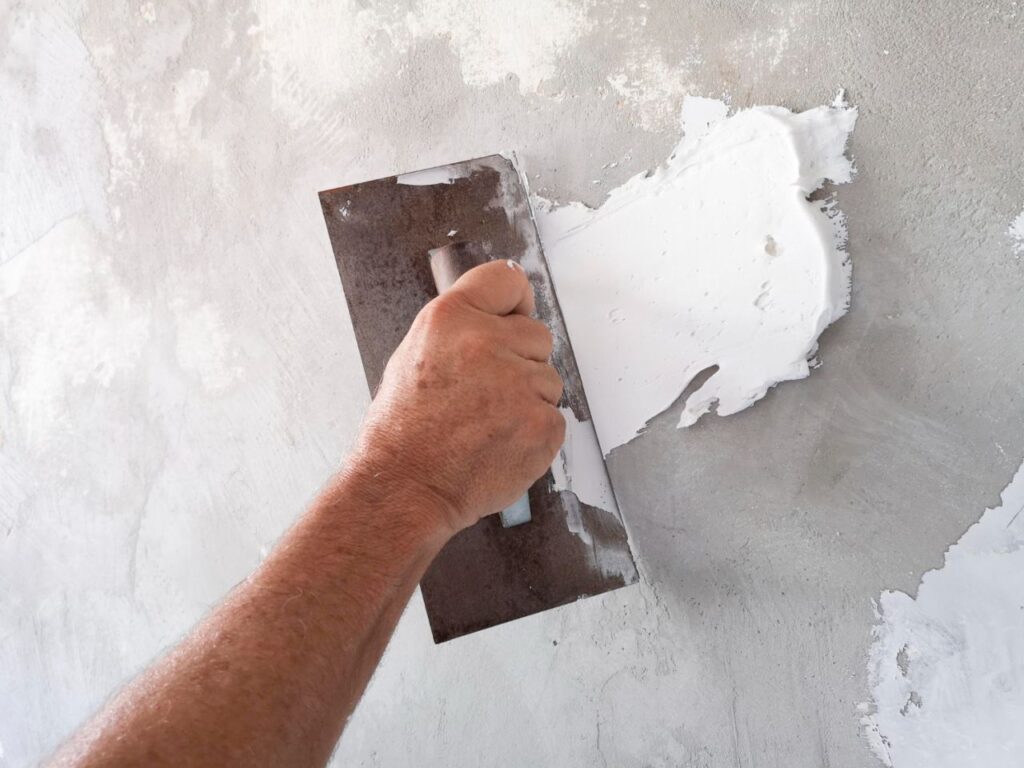
To begin, the wall should be prepared as outlined in the previous section, ensuring it is clean, free of debris, and properly primed. Next, the base coat of plaster is mixed according to the manufacturer’s instructions and applied to the wall using a plastering trowel. The plaster should be applied evenly and to the desired thickness, usually around 10-15mm for the base coat.
After the base coat has been applied and allowed to set, the finishing coats can be applied. These are mixed to a smoother consistency and applied in thinner layers to achieve a smooth finish. The plaster should be applied in a sweeping motion, working from the bottom of the wall to the top. Once the finishing coats have been applied, the surface can be smoothed using a plastering float or trowel.
Finally, the plaster should be allowed to dry completely before any further decoration or painting is carried out. This process can take several days, depending on the thickness of the plaster and the conditions in the room. Once dry, the plaster can be painted or decorated as desired, leaving you with a beautifully plastered wall.
Required Equipment and Supplies
To avoid leaving the wall plastering job in the middle to gather tools, it’s wise to be ready. Plasterers float, corner trowels, hawk boards, two buckets, mixing sticks or paddles, sufficient plaster, dust sheets, PVA, sandpaper, clean water, a stepladder or stilts, a dust mask, and trowels and buckets are all necessary tools and materials for the job.
How to Plaster Walls Step by Step
Plastering is the last step when finishing a wall, whether inside or out. Plastering is a complex task best handled by experts, but any homeowner can accomplish it with the right tools and approach. To begin, whip up a quantity of plaster that is thick and just combined. After trowelling the plaster onto a pristine wall, smooth it out using a handheld float. It will be ready to paint or wallpaper after you’ve smoothed out any bumps or irregularities.
Setting Up Your Workspace And Supplies
Get the Tools Clean First.
In a competent plastering project, one of the most critical (and frequently disregarded) needs is to avoid contamination. Make sure that all the tools that will touch the wall-the trowels, buckets, floats, and so on-are clean before mixing the plaster. You can’t call it clean if you aren’t comfortable eating off of it.
- The plaster’s adhesion and setting time might be compromised if even a little unfinished plaster from an earlier work gets on the wall. Soak the plaster in cold water and stir very little if you prefer a leisurely setting. If you want the plaster to set quickly, mix thoroughly with hot water.
Keep Your Work Area Clean by Laying Out Drop Clothes.
Protect yourself from spills, dust, and muddy mortar footprints with inexpensive canvas sheeting or plastic tarps. Because plastering can get quite dirty, taking this precaution will save you a lot of work when it comes time to clean up. Because you’ll have to use rags and water to remove any dropped plaster, black walls are the most difficult to clean with plaster.
- Be cautious to adequately cover any wood or laminate floors you may have before applying plaster.
- Tape the drop cloth firmly to the floor under the wall to create an airtight barrier.
- Drop cloths can be easily cleaned by rolling them up, taking them outdoors, and spraying them down with a cleaning solution.
- Too much water in the mixture is the leading cause of plaster slipping off the tools. The amount of plaster that falls to the floor gets on your hands and needs cleaning, which will decrease as your skills improve.
Get Rid of Dust and Debris By Scrubbing the Wall.
Scrub the entire wall with a dry, firm brush. Areas with substantial accumulation or clumps left behind by peeled layers of old plaster require special attention. After brushing, use a moist cloth to restore the wall’s original finish.
- Before plastering over soiled spots, prime them.
- Before plastering, fix any holes or cracks in the wall.
- Plastering may only begin after the walls and ceilings have been levelled and checked for plumb. If you don’t, the finished wall can have lumps and indentations.
- Simply running your finger over the surface will indicate whether the wall is prepared to receive fresh plaster. It still needs some attention if it gets dust-covered when you remove it. If you spray it with water, the new plaster will stick better to the old wall.
- Cleaning the work surface is the first step in every plastering project, whether covering a new lath or refinishing an old wall. The plaster will not stick to surfaces that contain dust, soap, oil, tar, or mould. Additionally, if the wall is very dry, the plaster will absorb the water and set it before it can adhere to the surface.
Apply PVA glue on the wall using a brush to make it ready to hold the plaster.
Fill a disposable paint tray with equal parts water and PVA glue and mix until well combined. Get the PVA all over the wall by rolling or brushing it on. Plaster works best when applied while the PVA coat is still sticky and not fully dry.
- PVA glue is an absolute must to ensure the new plaster sticks to the wall.
- A preparatory coat will also stop the substrate from absorbing plaster moisture, which may lead to crumbling.
Mix Your Plaster
Use a 5- or 7-gallon (26.5 L or 18.9) (19-26 L) bucket for the plaster. Clean, chilly water should fill the bucket halfway up. Pour the contents of a fresh bag of plaster mix into the bucket and mix until a mound is formed, making sure to shake it well. After that, start mixing in the dried plaster bits using a plunger or stirring stick.
- Never turn the plaster mixture upside down; add water to the mix. The plaster will set too quickly to deal with if you add water, and you’ll have to press down on it to mix it from the bottom of the pail, which is inconvenient. Incorporate the plaster while stirring the mixture.
- When mixing up many batches, an electric drill attachment with a paddle can be a lifesaver. You probably already know this, but mixing the plaster with an attachment on your drill will set considerably faster. For big projects requiring rapid plaster application, use the attachment. Mix the plaster by hand in a smaller bucket if you are doing little patchwork. This will allow you more time to work because the plaster will set more slowly.
Continuously stir the plaster to thicken it.
To thicken the plaster, stir it constantly. Continue to stir until there are no lumps and the mixture is completely smooth. To remove any stubborn dry pockets that may have formed, scrape the edges of the bucket periodically. The final consistency of the plaster should be similar to peanut butter.
- A wooden paint stirrer inserted into the bucket will give you a decent idea of how thick the plaster has to be. Your plaster is perfect if it can stand on its own.
Laying Down the Initial Layer of Plaster
Fill Your Hawk Board With New Plaster.
Remove the plaster from the bucket by using the trowel’s edge. You may easily load the hawk with plaster that has been moved to a different surface, such as a tarp or mixing table. If you want to avoid stopping your flow to add more, pile it on.
- The plaster shouldn’t cling to the hawk when mixed correctly. But if you want, you can slightly moisten the hawk to aid its release.
Prepare a minimal quantity of plaster using your trowel.
Apply a continuous layer of plaster from floor to ceiling by sliding the trowel’s flat edge under the plaster and picking up an adequate amount. Maintaining the plaster in the exact middle of the trowel will maximize efficiency and precision.
- Apply a small amount of plaster first, then apply more if necessary. Instead of trying to smooth out an uneven glob, it’s far simpler to construct the coat as you go.
Begin at the bottom corner and spread the plaster all over the wall.
While standing, stoop down and gently lift the plaster of the wall in an arc to reach the highest sections. Over two to three inches (five to eight centimetres), while you’re at the peak of your stroke, turn the trowel handle counterclockwise and lower it back down. Gradually applying plaster using this same method is the way to go.
- If the plaster is still too pliable and slips around on the wall, give it five minutes to harden a bit, then give it another tap with the trowel. This time, it will stay put.
- Maintain a small slant with your trowel. The plaster can be pulled away from the wall if held flush.
- Ensure the first coat is around 3/8″ (1 cm) thick.
Work in sections to plaster the wall.
Spread the plaster evenly from the bottom to the top as you work along the wall. While pausing, add additional plaster on your hawk board. Repeat the pattern to ensure that the plaster covers the whole area uniformly.
- You might use a stepladder to reach the top corners of the wall.
- At this time, the thickness doesn’t have to be precisely right. Later on, you’ll want to smooth and polish the plaster again.
Gently Smooth the Initial Layer of Plaster.
You need to clear your trowel and run it in all directions over the wall once the plaster is in place. Keep the pressure constant and concentrate on areas with thicker plaster or seams formed by higher edges. Like icing a cake, you want to ensure that the surface is smoother and more even with each sweep.
- You can re-wet the initial plaster sections using a spray bottle if you need to. They will be more receptive to the trowel after this.
- A damp, high-quality paintbrush is a lifesaver if you need to touch any rough edges or corners.
Before applying the second coat, if desired, scrape the plaster to create texture.
You could want to score the wet plaster to improve the base for the second coat. When working with plaster, use a deviling float or notched trowel to rake it vertically from end to end. No more worrying about the plaster breaking or separating-you’ve given it something to cling to.
- You can use a regular fork instead if you don’t have access to the tools above, but it will take a lot more time.
- Scoring increases the wall’s surface area and improves the adhesion of the second coat by creating shallow grooves.
FAQs About Plastering
Should I Apply Multiple Coats Of Plaster?
Yes, applying at least two or three coats of plaster is recommended to achieve a smooth and durable finish. Allow each coat to dry completely before applying the next one.
How Long Does Plaster Take To Dry Between Coats?
Drying times can vary depending on temperature, humidity, and plaster type. Generally, allow each coat to dry for 24-48 hours before applying the next one.
How Do I Achieve A Textured Plaster Finish On The Wall?
To achieve a textured finish, use a textured roller, sponge, or brush to create patterns or textures in the wet plaster before it dries. Experiment with different techniques to achieve the desired effect.
What Should I Do If I Encounter Imperfections Or Air Bubbles In The Plaster?
Use a damp sponge or cloth to smooth out minor imperfections or air bubbles while the plaster is still wet. For larger imperfections, wait until the plaster is dry, then sand the surface lightly and apply additional coats as needed.
How Do I Finish And Maintain Plastered Walls After Plastering?
Once the plaster is completely dry, sand the surface lightly to smooth out any rough spots or unevenness. Wipe down the walls with a damp cloth to remove dust, then apply primer and paint or other finishing treatments as desired. Regular maintenance involves cleaning walls periodically and promptly addressing any cracks or damage to ensure the plastered surface’s longevity.
Application and Finish Coat Polishing
Apply a Second and Last Coat of Plaster.
A 1/12″ (or 2mm) layer of outer “skim” coat is sufficient, but a thickness of 3/8″ is also acceptable. Be careful not to leave any visible seams or gaps when applying this layer, following the same procedure as the first.
- You can use a trowel to smooth the skim coat or, alternatively, switch to a float for the final touches.
Make Sure It’s Even By Using A Float.
To smooth out any rough spots, lines, holes, or uneven thickness in the wet plaster, gently glide the float over the surface from side to side. The finished wall should look homogeneous and smooth.
- Go at your own pace. While it may be tedious, smoothing plaster is an essential step in the process.
- Avoid over-polishing the plaster. It will eventually become glossy, which can make paint and wallpaper come off easier.
Give the plaster time to set.
Plaster drying time varies from two to five days, depending on the environmental factors. While the new plaster dries, could you not touch it? The final wall will show any flaws it picks up during this process.
- Plaster composition, work area temperature, and air humidity affect drying periods.
- Before applying wallpaper, paint, or any other embellishments, ensure the wall is completely dry.
Follow These Steps After Plastering:
- Various methods of cure can be used. Once the plastering is done, the wall can be cured using whatever method.
- Please remove the tile that shows the button mark.
- After plastering is finished, we should remove the mortar waste peeled from the ground; otherwise, we will have to chisel it off in the future.
Conclusion
Plastering is a crucial process in construction, involving the mixing of cement, sand, and water to cover blockwork and artistry dividers. It is essential for its effectiveness, durability, and utility. To properly plaster a wall, one must have the right tools and materials, such as a plasterer’s float, corner trowels, hawk boards, buckets, mixing sticks, and sandpaper.
Plastering is the final step in finishing a wall, and it is best handled by experts. To begin, create a thick, well-combined plaster and trowel it onto a clean wall. Clean your workspace and tools, ensuring they are clean before mixing the plaster. Keep your work area clean by laying out drop cloths and covering any wood or laminate floors. Scrub the wall with a dry brush to remove dust and debris, prime soiled spots, and fix any holes or cracks.
Plastering can only begin after the walls and ceilings have been leveled and checked for plumbness. Clean the work surface to prevent dust, soap, oil, tar, or mold from adhering to the wall. Apply PVA glue on the wall using a brush to make it ready to hold the plaster. A preparatory coat will prevent the substrate from absorbing plaster moisture, preventing it from crumbling.
In summary, plastering is a complex task that requires careful preparation and preparation. Choosing the right plastering method is essential for a successful project.
To create a plaster, mix a fresh bag of plaster mix in a 5- or 7-gallon bucket with clean, chilly water. Add dried plaster bits and stir constantly to thicken the mixture. Use an electric drill attachment for faster application or mix by hand for smaller projects. Use a wooden paint stirrer to determine the plaster’s thickness. Fill a hawk board with new plaster and remove the plaster from the bucket. Apply a continuous layer of plaster from floor to ceiling using a trowel, ensuring the plaster is in the exact middle. Apply a small amount first and then more if necessary. Spread the plaster all over the wall, gently lifting it in an arc to reach the highest sections. Gradually apply plaster using the same method. If the plaster is too pliable, give it five minutes to harden and then tap it again. Maintain a small slant with the trowel and ensure the first coat is around 3/8″ thick.
Plaster the wall in sections, spreading the plaster evenly from the bottom to the top. Repeat the pattern to ensure uniform coverage. Gently smooth the initial layer of plaster, focusing on areas with thicker plaster or seams formed by higher edges. Re-wet the plaster sections with a spray bottle or a damp paintbrush. Before applying the second coat, scrape the plaster to create texture and score the wet plaster to improve the base. Apply a 1/12″ or 2mm outer “skim” coat, ensuring no visible seams or gaps. Smooth the wet plaster with a float to ensure evenness. Go at your own pace and avoid over-polishing the plaster. Allow the plaster to set for two to five days, depending on environmental factors. After plastering, follow the steps of curing the wall, removing the tile with the button mark, and peeling the mortar waste from the ground.
Content Summary
- Plastering is integral to construction in Australia, with diverse methods and mixes.
- Choosing the right plaster type is crucial for project success.
- Plastering is essential for weatherproofing and structural integrity.
- It prevents water penetration and strengthens surfaces.
- Plastering ensures durability, regardless of weather conditions.
- Detailed instructions guide plastering for novices and experts alike.
- Essential equipment includes floats, trowels, buckets, and more.
- A clean workspace is vital for a successful plastering job.
- Dust sheets and PVA glue prepare the area for plastering.
- Cleaning tools thoroughly prevents contamination and ensures adhesion.
- Drop cloths protect surfaces from spills and make cleanup easier.
- Dust and debris must be removed before plastering for a smooth finish.
- Priming and patching holes ensure an even surface for plastering.
- Plastering should only commence on levelled and clean surfaces.
- Proper preparation includes scrubbing walls and applying PVA glue.
- Mixing plaster to the right consistency is crucial for application.
- Electric drills aid in mixing larger batches of plaster efficiently.
- Continuous stirring ensures a smooth plaster consistency.
- Loading plaster onto a hawk board prepares it for application.
- Applying plaster in sections ensures uniform coverage.
- Smoothing plaster with a trowel creates an even surface.
- Using a stepladder aids in reaching higher wall sections.
- Gently smoothing plaster ensures an even coat.
- Scoring wet plaster improves adhesion for subsequent coats.
- Applying a second coat ensures a durable finish.
- Floats help achieve a smooth surface for the final coat.
- Polishing plaster should be done carefully to avoid glossiness.
- Allowing plaster to dry thoroughly is crucial before finishing.
- Proper drying time varies based on environmental factors.
- Walls must be completely dry before applying paint or wallpaper.
- Various curing methods can be employed post-plastering.
- Removing waste and debris is essential after completing plastering.
- Attention to detail ensures a professional plastering job.
- Thorough preparation leads to better plaster adhesion.
- Proper mixing techniques result in consistent plaster quality.
- Applying plaster in sections ensures an even finish.
- Smooth application with a trowel is essential for a professional look.
- Working methodically ensures efficient plastering.
- Polishing plaster creates a smooth and even surface.
- Allowing plaster to dry completely prevents future issues.
- Environmental factors influence plaster drying times.
- Careful post-plastering steps ensure a clean finish.
- Removing debris prevents future complications.
- Plastering is a skill that improves with practice.
- Taking the time to prepare yields better plastering results.
- Thorough mixing is essential for consistent plaster quality.
- Applying plaster in thin, even layers ensures durability.
- Smooth application with a trowel creates a professional finish.
- Proper drying time is crucial for long-lasting plaster.
- Following instructions meticulously leads to successful plastering.

